
 Cup snack is a snack place that kids love. You may also often find this cup model, which consists of two containers. One for the biscuits and the other a smaller container is the place for chocolate cream. Based plastics are making use of the injection process, it is not surprising that the lower profile is smaller than the top. Of course this meant that during the injection process in mold-press, the plastic model can get out easily. Simple but interesting for us try to make the drawing.
At least there are six steps to create this model, namely: extrude boss, boss cut, move face, draft, fillet and shell.
Extrude Boss/Base
Used to form the body cup snack. Actually we can also use the Revolved Boss/Base command, but this time we use the Extrude Boss/Base command because I want to show you on how to create a draft angle on the dialog box of Extrude Boss/Base.
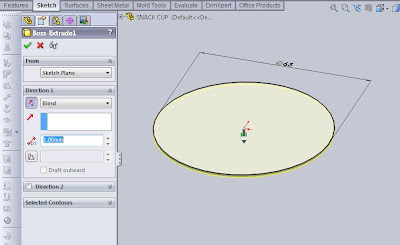
At the Feature Manager click Top Plane and then on the Menu select Insert> Feature> Extrude or click Extrude on the Feature toolbar. Click the circle on the Sketch toolbar and create a circle centered at the origin with a diameter of 65. Click Exit Sketch.
Then in the dialog box below Direction1 select End Condition: Blind to the direction of the arrow down. If the direction of an arrow pointing upwards, click the Reverse Direction box that the position at the left of the Blind box. Set Depth to 1mm. This thickness will be used as well as the thickness for the body model. Then click OK.
Next is to make gap parts of cup snack. This time I use the Extruded Cut command to sketch a line profile. Although only the line but we can specify the desired thickness of the piece. On Feature Manager click Front Plane and select Insert> Cut> Extrude, or on the Feature toolbar select the Extruded Cut. Change the look of the drawing in Normal To position by selecting it in the View Orientation toolbar or click (Ctrl +8). Then select the Line on the Sketch toolbar. Create a vertical line with a distance of 7mm with center products.
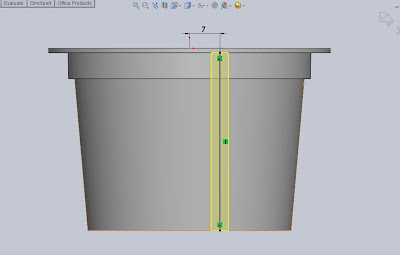
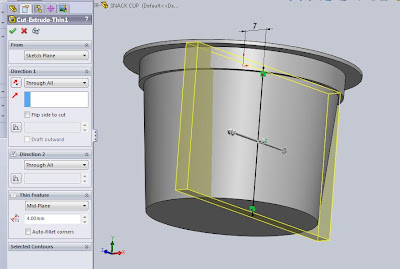
Click Exit Sketch and then the dialog box appears. Under the Direction 1 and Direction 2 parameter, select the end condition on Through All. And below Thin Featured parameter select the Mid-Plane type with 4mm thick. Click OK.
Move Face
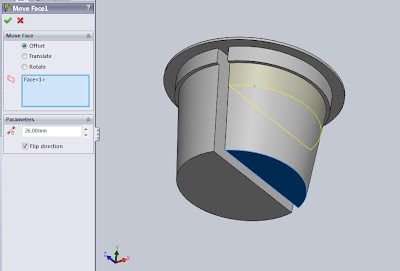
Now there are two parts of a cup snack that we have made, big and small. Move Face command will form part of a small cup snack shorter forms. On the Menu select Insert> Face> Move or on the Mold toolbar select the Move Face. Under the parameters of the Move Face, click Offset and click the surface to be moved. Under Parameters, write distance 26mm and check Flip direction. Click OK.
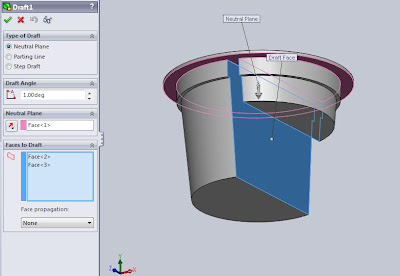
Draft
The next step is to draft command to form a bottom piece of cup becomes larger than the top. This is made so that the process of making a cup snack on the injection machine, the cup snack will be easier to get out of the mold. On the Menu select Insert> Feature>Draft or on the Feature toolbar select Draft. In the dialog box, select the Neutral Plane for Type Draft. Draft Angle 1 degree, and then click surface of pink as the Neutral Plane. Click on the two surfaces are colored blue as Faces to Draft. Click OK.
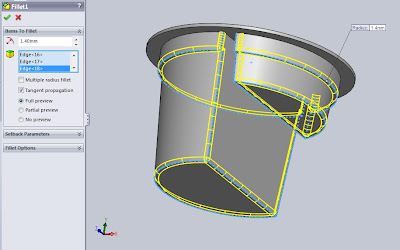
Fillet/Round
Add Fillet command to form a radius at the ends of the lower cup. On the Menu select Insert> Features> Fillet/Round or the Featured toolbar choose Fillet. Under parameter of Item to Fillet, write 1.4mm radius. Then click on all the ends you want to fillet. Click OK.
Shell
The last command is Shell, which is used to define the thickness of thin and thick shell elements. On the Menu select Insert> Feature> Shell or on Featured toolbar select Shell. Under Parameters write distance 1mm and click surface to be modified. Click OK. And now we have successfully made the cup snack. Good luck!

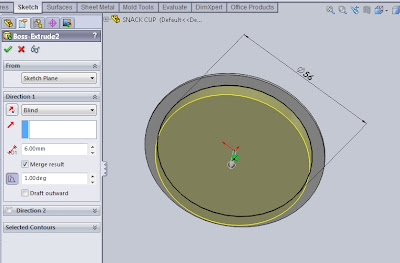
Next place the cursor on the graphics area, click and hold the scroll and rotate your image to the bottom of the model shown above. Then click below the surface and on the menu select Insert> Feature> Extrude or click Extrude on the Feature toolbar. Create a sketch of a circle by clicking the circle on the Sketch toolbar and place its center at the origin. Give dimensions of 56mm by clicking on the Smart Dimension on the Sketch toolbar. Then the Exit Sketch.
Dialog box will appear on Feature Manager and set distance to 6mm below Direction1, Result Merge check, and click the Draft On/Off then fill it with a draft angle 1 degree. click OK.
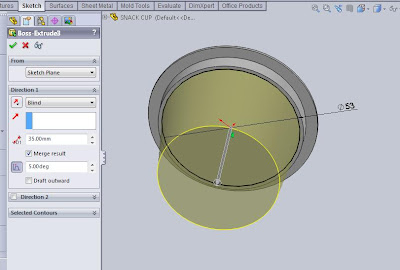
Still with the same command, place the cursor on the graphics area, click below the surface and on the Menu select Insert> Feature> Extrude or click Extrude on the Feature toolbar. Create a sketch of a circle by clicking the circle on the Sketch toolbar and place its center at the origin. Give dimensions of 53mm by clicking on the Smart Dimension on the Sketch toolbar. Then the Exit Sketch.
Dialog box will appear on Feature Manager and set distance to 35mm below Direction1, Result Merge check, and click the Draft On/Off then fill it with a draft angle 5 degree. click OK. Extrude command is now complete we are doing.
Extruded CutDialog box will appear on Feature Manager and set distance to 6mm below Direction1, Result Merge check, and click the Draft On/Off then fill it with a draft angle 1 degree. click OK.

Still with the same command, place the cursor on the graphics area, click below the surface and on the Menu select Insert> Feature> Extrude or click Extrude on the Feature toolbar. Create a sketch of a circle by clicking the circle on the Sketch toolbar and place its center at the origin. Give dimensions of 53mm by clicking on the Smart Dimension on the Sketch toolbar. Then the Exit Sketch.
Dialog box will appear on Feature Manager and set distance to 35mm below Direction1, Result Merge check, and click the Draft On/Off then fill it with a draft angle 5 degree. click OK. Extrude command is now complete we are doing.

Next is to make gap parts of cup snack. This time I use the Extruded Cut command to sketch a line profile. Although only the line but we can specify the desired thickness of the piece. On Feature Manager click Front Plane and select Insert> Cut> Extrude, or on the Feature toolbar select the Extruded Cut. Change the look of the drawing in Normal To position by selecting it in the View Orientation toolbar or click (Ctrl +8). Then select the Line on the Sketch toolbar. Create a vertical line with a distance of 7mm with center products.

Click Exit Sketch and then the dialog box appears. Under the Direction 1 and Direction 2 parameter, select the end condition on Through All. And below Thin Featured parameter select the Mid-Plane type with 4mm thick. Click OK.

Move Face
Now there are two parts of a cup snack that we have made, big and small. Move Face command will form part of a small cup snack shorter forms. On the Menu select Insert> Face> Move or on the Mold toolbar select the Move Face. Under the parameters of the Move Face, click Offset and click the surface to be moved. Under Parameters, write distance 26mm and check Flip direction. Click OK.

Draft
The next step is to draft command to form a bottom piece of cup becomes larger than the top. This is made so that the process of making a cup snack on the injection machine, the cup snack will be easier to get out of the mold. On the Menu select Insert> Feature>Draft or on the Feature toolbar select Draft. In the dialog box, select the Neutral Plane for Type Draft. Draft Angle 1 degree, and then click surface of pink as the Neutral Plane. Click on the two surfaces are colored blue as Faces to Draft. Click OK.

Fillet/Round
Add Fillet command to form a radius at the ends of the lower cup. On the Menu select Insert> Features> Fillet/Round or the Featured toolbar choose Fillet. Under parameter of Item to Fillet, write 1.4mm radius. Then click on all the ends you want to fillet. Click OK.

Shell
The last command is Shell, which is used to define the thickness of thin and thick shell elements. On the Menu select Insert> Feature> Shell or on Featured toolbar select Shell. Under Parameters write distance 1mm and click surface to be modified. Click OK. And now we have successfully made the cup snack. Good luck!


No comments:
Post a Comment