
In a previous post, I have made a model of how to draw a Nut. This time I will make another model with some improvements, the most prominent of which is to make a sketch to fully define sketch. This can be easily sketch the outline color from blue to black. Also other improvements such as traffic command without first having to click OK in the dialog box to continue with the next command. In addition to saving command also saves time making the picture. But that does not mean Nut model that I made this the most perfect, that you should emulate. No. You can improvise with other commands that may be different from what I do, but it gives the same result. Well, I just started making steps:
1. Extrude Boss, to create the body
- Right Plane. Right click on Plane and then click Extruded Boss on the Feature Toolbar
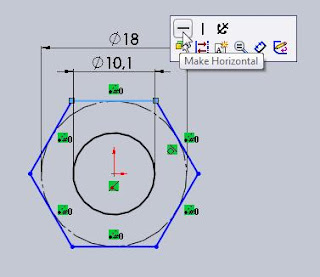
- Sketch of Polygon. Sketch toolbar is automatically active. Select Polygon and then place the cursor on the Origin view, slide to the right slightly and then click OK. Number of sides will automatically be pointed to figures 6 (six)

- Smart Dimension. Click on the Sketch toolbar smart dimension and set it on a 18mm diameter circle.
- Sketches a Circle. Make a circle by selecting the Circle on the sketch toolbar. Place a circle right in the middle of sketch polygons. This circle is in a hole the size of the nut. Determine the size of the diameter at 10.1mm by choosing smart dimension sketch and then click the circle.
- Add relations. In the sketch toolbar select add relations and then click one horizontal line on sketch of polygon. In this tutorial I took the upper horizontal line. You can see the difference in horizontal lines that I have now changed click color from blue to light blue. Then a small box will appear at the top right and select the make horizontal. This command will make the sketch changed to fully define sketch in which the color changed from blue to black. Exit Sketch.
- Depth. In the Dialog Box Boss-Extrude write with 10.8mm thickness. Then in select Mid Plane End condition. Click on OK.

- Sketches by a circle. Click on the front surface of the nut and then select Feature Extruded Cut on the toolbar. Sketch toolbar is now active. Select the Circle on the Sketch toolbar and then on the Origin and end up outside the circle touching the sides of the polygon.
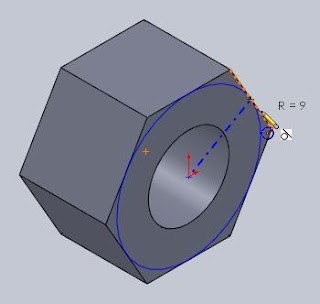
- Add relations. Then you just choose Add Relation to sketch the toolbar without having to click OK on the dialog box circle. In the Add Relation dialog box will be automatically selected under parameter Arc1 Selected Entities. Now you just need to click on one of the outer edge of the polygon are tangent to the line of the circle.
- Tangent. Click below the parameter tangent Add Relations. Click on OK. Continue to Exit sketch. (If you want to see if the circle has changed color to black, left-click on any image area outside the image model).
- Draft Angle. Dialog box will appear. Then fill in the End condition under Direction1 parameters on Through All. Click the Flip side to cut. Draft On and set at 60 degrees. Click on OK.

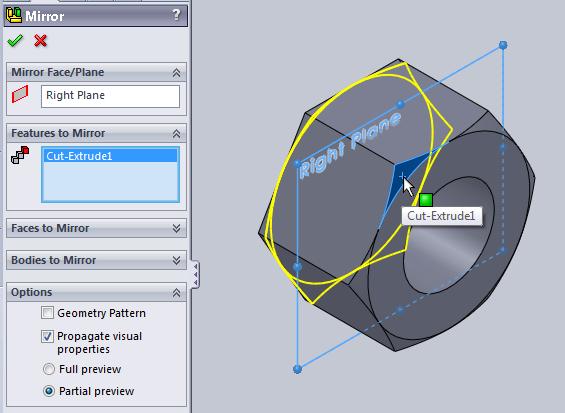
3. Mirror, create a copy of the extruded cut command to chamfer the back side
- Right Plane. Right click on Plane Mirror Feature and then click Toolbar.
- Feature to mirror. Selection of features that have been truncated. Then click OK.
4. Chamfer, adding the chamfer command on both sides of the hole inside.
Select the chamfer on the Feature toolbar. Then on the chamfer parameters, selection of the two sides will chamfered. Set on a 1mm distance. Click on OK.

5. Swept Cut, creating a threaded groove
- Helix and Spiral. Selection of one surface of the Nut. Select the Helix and Spiral on Feature toolbar. Selection the outside of the circle that chamfered and then select Convert Entities on the Sketch toolbar. Click OK.
- Pitch. In the dialog box that appears, under the parameters of Defined By, select Height and Pitch. Set the Height to 12mm (or thicker than thick of Nut) and Pitch at 1.75mm. Click the Reverse direction and set the Start angle at 0 degrees. Click OK.

- Sketches by a polygon. In the Feature Manager select the Top Plane and select the Polygon on the Sketch toolbar that automatically activated. On the View Orientation select Normal To (or press Ctrl +8).
- Number of sides. Set the number of sides on 3 in the dialog box. Select the Smart Dimension and set distance above the end point of the triangle with the origin at 6mm and set the width of the base triangle at 1.5mm or smaller than 1.75mm of pitch.
- Add relations. Select the Add Relation to sketch the toolbar and create relationships like the picture below that is the leftmost point coincident with the edge of the nut and the base triangle is made horizontal. Exit sketch.

- Swept Cut. Directly select Swept Feature Cut on the toolbar. In the profiles dialog box will be selected automatically. And now you live below the Path selection profile parameters. Click OK.

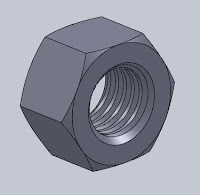
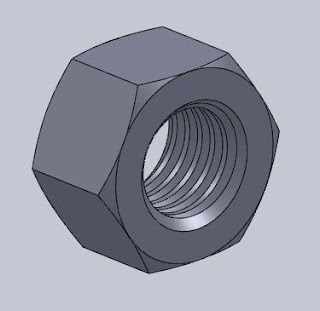
The results of the model will be like the picture below
GOOD TRY!


No comments:
Post a Comment