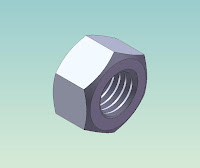
To learn step by step how to draw a Nut M12x1.75 easily. These steps use Extrude, Cut Extrude, Chamfer & Cut Sweep with Helix ordered
LEARN TO DRAW A NUT
Create the Extrusion
- Click Extruded Boss/Base
 on the Features toolbar.
The Front, Top, and Right planes appear, and the pointer changes to
  .
.
- Select the Front plane.
- In Toolbar Menu, select Tool, Sketch Entities, Polygon
- Move the pointer to the sketch origin. Click the origin
 , then move the pointer vertically to create a polygon.
In the Property Manager, under Parameters:
· Set Number of Sides to 6.
· Click Inscribed circle.
· Set Circle Diameter to 18.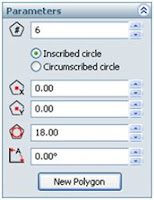 Click OK
  .
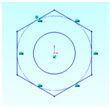
Click Circle
  on the Sketch toolbar.
Click the origin
 , then move the pointer to create a circle.
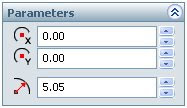
In the Property Manager, under Parameters:
· Set Radius to 5.05.
 Click Exit Sketch
  on the Sketch toolbar.
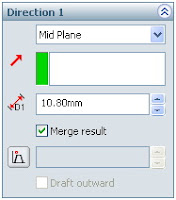
In the Property Manager, under Direction 1:
· Select Mid Plane in End Condition.
· Set Depth to 10.8.

12. Click
OK to create the extrusion.
For more complete instruction, please open or download pdf file beside!
 To learn step by step how to draw a Nut M12x1.75 easily. These steps use Extrude, Cut Extrude, Chamfer & Cut Sweep with Helix ordered
LEARN TO DRAW A NUT
Create the Extrusion
 on the Features toolbar.
The Front, Top, and Right planes appear, and the pointer changes to
  .
.
 , then move the pointer vertically to create a polygon.

 .
.
 on the Sketch toolbar.
 , then move the pointer to create a circle.


 on the Sketch toolbar.
 12. Click OK to create the extrusion.
For more complete instruction, please open or download pdf file beside!


7 comments:
Why not just give the complete tutorial?
This does not show how to complete the thread.
For complete tutorial, please download my pdf format file "How to Draw a Nut".
I just made a tutorial "how to draw a nut" with a few improvements. Please follow
Hi i am new to autocad and i am trying to create your nut using autocad 2012 but finding it difficult, will it work on autocad 2012 ? also where is the icon to download the PDF file ? Any feedback would be greatly received.
No pdf.
Where's the PDF????
@lisvard: try this link
http://www.ziddu.com/downloadlink/2502259/To_Draw_a_Nut.pdf
Thanks !! that helps :)
Post a Comment